17. Appendices
17.1. Setting up DNS using dnsmasq
DNS is designed to be a distributed, hierarchical, system of mapping names to IP addresses (and the reverse, IP addresses to names).
Note
To learn more about it, see:
- How the Domain Name System (DNS) Works, by Verisign
- How does DNS work?, by D.J. Berstein
- The Domain Name System, Wikipedia
The important thing to note is that if you only have one DNS server set, and that server only serves it’s own names and does not make recursive queries for domains it does not know, you will not be able to talk to many hosts on the internet.
These instructions will configure dnsmasq on a developer’s
workstation (e.g., a laptop computer) to serve as the primary
DNS server for that system, using a local DNS server behind a
VPN (when connected to the VPN) or recursively directing queries
to Google’s name servers for all other DNS requests. This should
work for any DNS requests made from this client system in a
reliable way.
17.1.1. Mac OS X configuration
Attention
The following instructions are partially specific to Mac OS X, which handles network configuration using System Preferences...
Start by creating a Location called VPN” to use for controlling the DNS configuration of the Mac. Figure :ref:`networklocation` shows the location *VPN enabled.
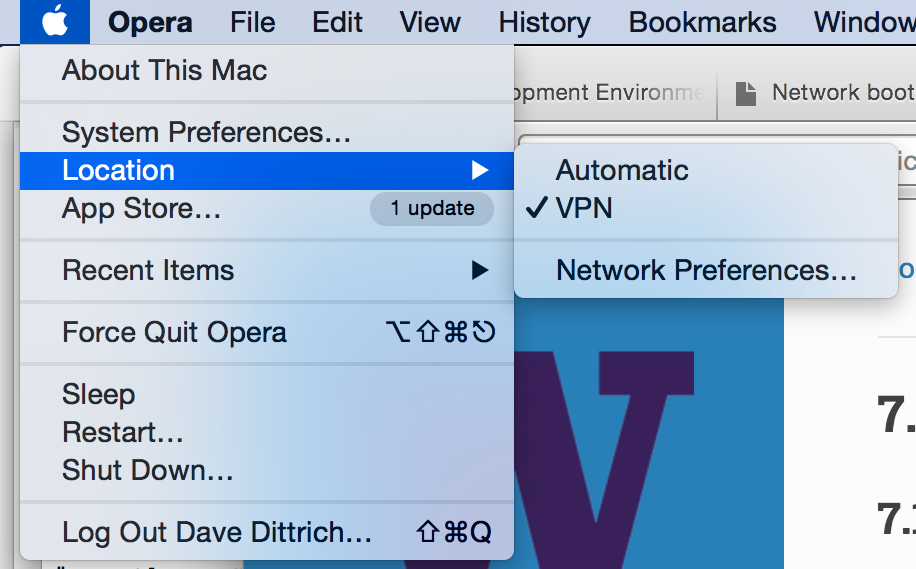
Mac OS X Network Preferences, Location
Figure Mac OS X Network Preferences, DNS shows the settings
for DNS Server and Search. Set DNS Server to
only be 127.0.0.1 for force all DNS queries to
only go to the local dnsmasq server. The Search
list should include your normal domain that you want
to be appended to any short (or partially qualified)
DNS names.
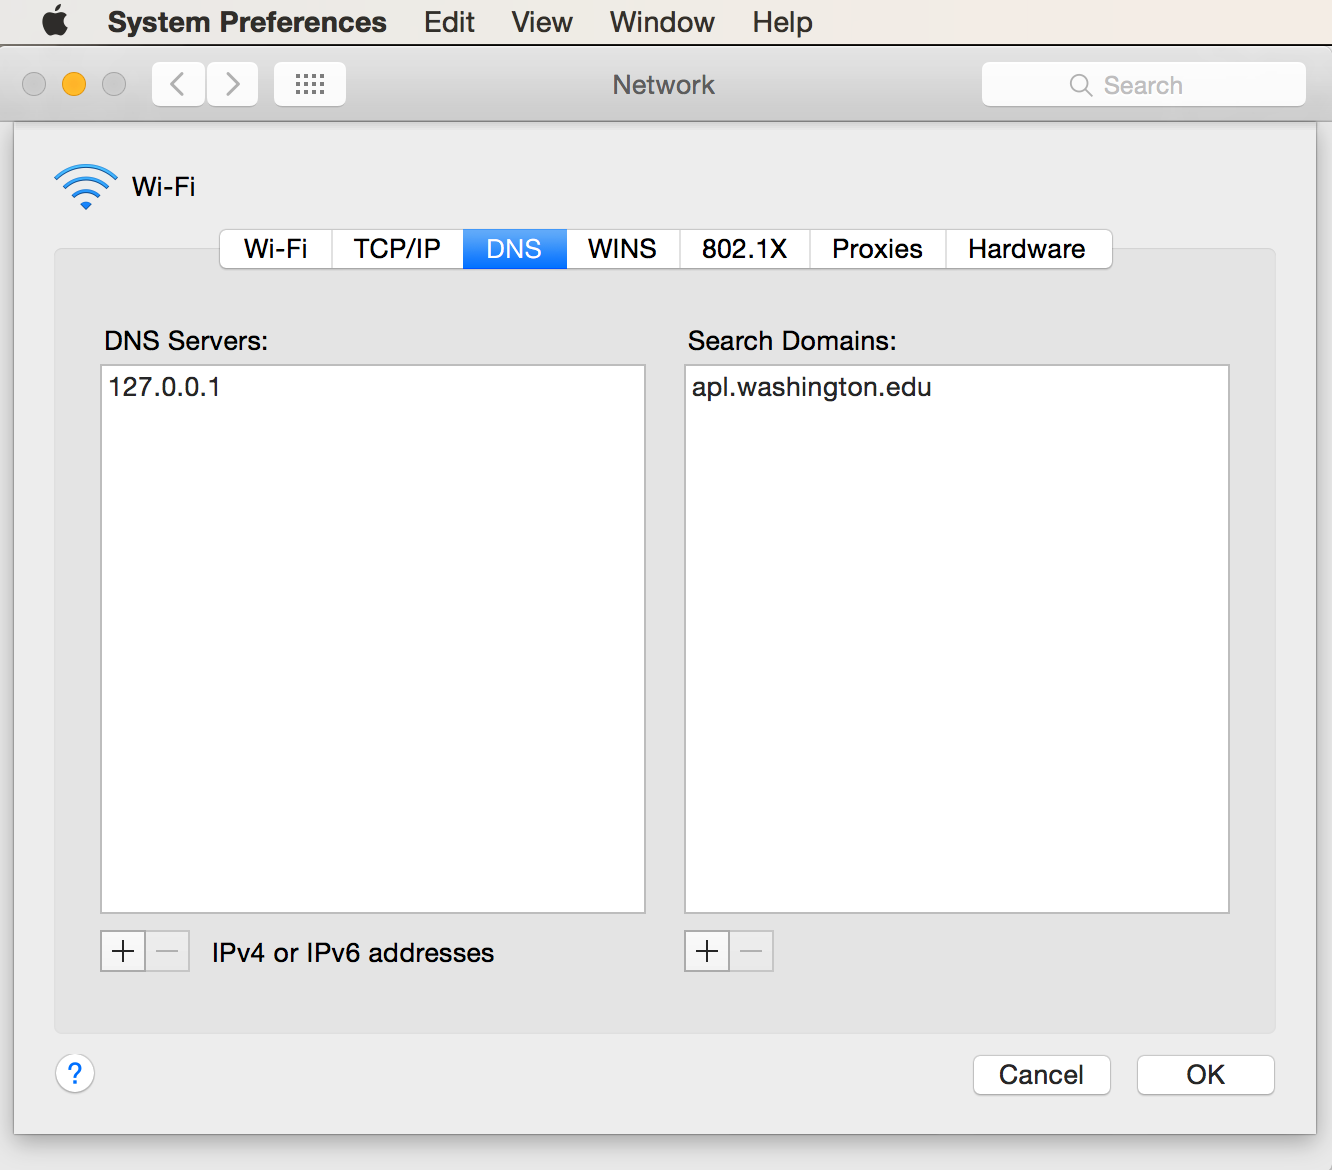
Mac OS X Network Preferences, DNS
When set this way, as soon as the network is enabled on any
interface (be it WiFi, Bluetooth, USB ethernet, or wired
ethernet), the VPN location will be enabled and the host’s
/etc/resolv.conf file will be set to look like this:
#
# Mac OS X Notice
#
# This file is not used by the host name and address resolution
# or the DNS query routing mechanisms used by most processes on
# this Mac OS X system.
#
# This file is automatically generated.
#
search devops.develop ops.develop
nameserver 127.0.0.1
Edit the dnsmasq configuration file (/opt/local/etc/dnsmasq.conf
on the Mac, and /etc/dnsmasq.conf on Ubuntu 14.04). Set the following
variables as shown in the examples.
Add a line referencing an alternative
resolve.conffile to control upstream DNS servers.# Change this line if you want dns to get its upstream servers from # somewhere other that /etc/resolv.conf #resolv-file=/etc/resolv.conf resolv-file=/etc/resolv.dnsmasq
Set the
serverentries for forward lookups containing the top level domaindevops.developand reverse maps for the DIMS VPN network range (192.168.88.0/24, which is expressed as88.168.192.in-addr.arpafor DNS reverse mappings) as shown in the highlighted lines here:# Add other name servers here, with domain specs if they are for # non-public domains. #server=/localnet/192.168.0.1 server=/devops.develop/192.168.88.101 server=/dims-dev.devops.develop/127.0.0.1 # Example of routing PTR queries to nameservers: this will send all # address->name queries for 192.168.3/24 to nameserver 10.1.2.3 #server=/3.168.192.in-addr.arpa/10.1.2.3 server=/88.168.192.in-addr.arpa/192.168.88.101
Note
The second
serverline in the first set above creates a test domaindims-dev.devops.developthat is served by thisdnsmasqserver on the local host address. This allows you to test services running on the loopback interface.Attention
Mac users will need to configure
dnsmasqto run under_mdnsresponderaccount. Use the following lines:# If you want dnsmasq to change uid and gid to something other # than the default, edit the following lines. user=_mdnsresponder group=_mdnsresponder
If you also have a home network that you wish to associate with a specific alternative domain, use the
domainsetting as shown here:# Set a different domain for a particular subnet #domain=wireless.thekelleys.org.uk,192.168.2.0/24 domain=home,192.168.1.0/24
Caution
When switching a VPN connection on and off, where you are trying to use non-public DNS names served by a server behind the VPN, you may encounter a situation where queries for a non-public domain are sent to public DNS servers, which will return an “NXDOMAIN” response, which looks like this
Host abcquq12examfooltest.com not found: 3(NXDOMAIN)
The local server may cache this result. When you then connect to the VPN and regain access to the private server which should be able to now respond with the correct result, your next attempt to resolve the domain may find the cached NXDOMAIN result and tell you the domain still does not exist (when you are assuming that it does, since the VPN is now up.) This is both confusing, and frustrating, unless you are aware of how DNS caching works.
To prevent this problem, disable negative caching as follows:
# If you want to disable negative caching, uncomment this.
no-negcache
Attention
As a debugging mechanism, you may need to enable logging of DNS queries and/or DHCP transactions. Do that by uncommenting the following lines:
# For debugging purposes, log each DNS query as it passes through
# dnsmasq.
log-queries

# Log lots of extra information about DHCP transactions.
log-dhcp
Create the alternative
resolv.conffile referenced in thednsmasq.conffile above to have the contents shown here:[dittrich@localhost etc]$ cat resolv.dnsmasq search devops.develop ops.develop nameserver 8.8.8.8 nameserver 192.168.88.101 nameserver 128.95.120.1
Test the configuration.
With VPN disconnected:
[dittrich@localhost etc]$ dig @127.0.0.1 jira.devops.develop

; <<>> DiG 9.8.3-P1 <<>> @127.0.0.1 jira.devops.develop
; (1 server found)
;; global options: +cmd
;; connection timed out; no servers could be reached
With VPN enabled:
[dittrich@localhost etc]$ dig @127.0.0.1 jira.devops.develop

; <<>> DiG 9.8.3-P1 <<>> @127.0.0.1 jira.devops.develop
; (1 server found)
;; global options: +cmd
;; Got answer:
;; ->>HEADER<<- opcode: QUERY, status: NOERROR, id: 58384
;; flags: qr aa rd ra; QUERY: 1, ANSWER: 1, AUTHORITY: 0, ADDITIONAL: 0

;; QUESTION SECTION:
;jira.devops.develop.    IN      A

;; ANSWER SECTION:
jira.devops.develop. 0   IN      A       192.168.88.97

;; Query time: 18 msec
;; SERVER: 127.0.0.1#53(127.0.0.1)
;; WHEN: Wed Jul  1 17:32:54 2015
;; MSG SIZE  rcvd: 60
17.1.2. Logging
On 7/2/15 6:47 AM, Linda Parsons wrote:

> Do you know where the queries are logged on os x? I can’t find logs
> anywhere. I can see in /var/log/system.log where dnsmasq is stopped and
> started - that’s it.
syslog and rsyslog are very fine-grained and controllable in terms of where
logs go (i.e., which file, which logging host, both, etc.), though each program
choses what facility and severity level it will log at. Here is excerpt from
dnsmasq man page:
-8, --log-facility=<facility>
Set the facility to which dnsmasq will send syslog entries, this defaults
to DAEMON, and to LOCAL0 when debug mode is in operation. If the facility
given contains at least one '/' character, it is taken to be a filename,
and dnsmasq logs to the given file, instead of syslog. If the facility is
'-' then dnsmasq logs to stderr. (Errors whilst read- ing configuration
will still go to syslog, but all output from a successful startup, and all
output whilst running, will go exclusively to the file.) When logging to a
file, dnsmasq will close and reopen the file when it receives SIGUSR2.
This allows the log file to be rotated without stopping dnsmasq.

...

When it receives SIGUSR2 and it is logging direct to a file (see
--log-facility ) dnsmasq will close and reopen the log file. Note that
during this operation, dnsmasq will not be running as root. When it first
creates the logfile dnsmasq changes the ownership of the file to the
non-root user it will run as. Logrotate should be configured to create a
new log file with the ownership which matches the existing one before
sending SIGUSR2. If TCP DNS queries are in progress, the old logfile will
remain open in child processes which are handling TCP queries and may
continue to be written. There is a limit of 150 seconds, after which all
existing TCP processes will have expired: for this reason, it is not wise
to configure log- file compression for logfiles which have just been
rotated. Using logrotate, the required options are create and delay-
compress.
So dnsmasq can bypass syslog/rsyslog filters and log directly to a
file.
Note
Adding the option log-facility=/var/log/dnsmasq.log diverts log messages
into the file var/log/dnsmasq.log.
Caution
dnsmasq, when logging directly to a file, does not handle
rolling of the log file or otherwise limiting its growth. The file
will just continue to grow without bounds over time. You can rename
the file at any time, then send the SIGUSR2 signal to the dnsmasq
process, which will open a new log file. (See the man page output
above for more details.)
Note
Ok, I figured out that dnsmasq logs to /var/log/debug.log in
general, which led me to realize these messages have a log level of debug.
But on Mac OS X the default is not to log debug messages. I had to edit
the /etc/asl.conf file to set the log level to debug. Then the
debug messages would show up in the console using all messages. Keep the
level at debug for a short time but have turned it off as it slows down
the system a lot. I could see from the debug statements how the request
to 127.0.0.1 were being forwarded.
Caution
Setting the full system logging level to debug just to get
messages from one service is over-kill. It is preferable to force
the specific service to log at a facility and/or severity
level that is then filtered by syslog/rsyslog, allowing
just those messages you want to be logged to go to a place you
want them to go. The log-faility option above works better
for this.
17.1.3. Split-Horizon DNS
Organizations often use non-routable network address ranges, as defined by RFC 1918 - Address Allocation for Private Internets, on the internal portion of a firewalled network that also has external internet-facing
The video DNS Split Brain explains some of the issues of handling DNS mappings in situations where networks are partitioned. An organization may have service domain names be the same to point to separate internal and external resources, even though they have completely different IP addresses. A web server, for example, may be accessible to users on the internet with limited public content, while another server that has the same fully-qualified domain name may be hosted on the inside of a firewall and VPN with different content that is private to the organization. Having multiple DNS servers, rather than just one DNS server, and configuring them to properly answer and/or forward DNS requests differently (depending on the perspective of the client making the request) adds complexity for system administration, but can simplify things from a user perspective when trying to access a resource.
References on configuring dnsmasq and the concept of Split-horizon DNS
are included in the dittrich:dns Section of the home page of
dittrich:homepage.
17.2. Using a Case-Sensitive sparse image on Mac OS X
At the beginning of Section Source Code Management with Git, a caution block describes a problem involving sharing source code repositories between systems having file systems that are case-sensitive with other operating systems having file systems that are case-insensitive.
This section provides the steps for creating a case-sensitive sparse HFS file image that can be mounted on a Mac OS X system to better integrate with Git source respositories using case-sensitive file and/or directory names in the respository.
Note
This example arbitrarily uses an 8GB sparse image. Change size as necessary for your own situation.
We are going to take the existing contents of a directory ($HOME/dims/git
in this case) and replace it with a mounted case-sensitive journalled HFS
sparse disk image. We are using a sparse image to avoid needlessly wasting
space by allocating a disk image larger than is necessary.
Use the OS X Disk Image app to create a sparse image. This is shown in Figure Creating a sparse image with Disk Utility.
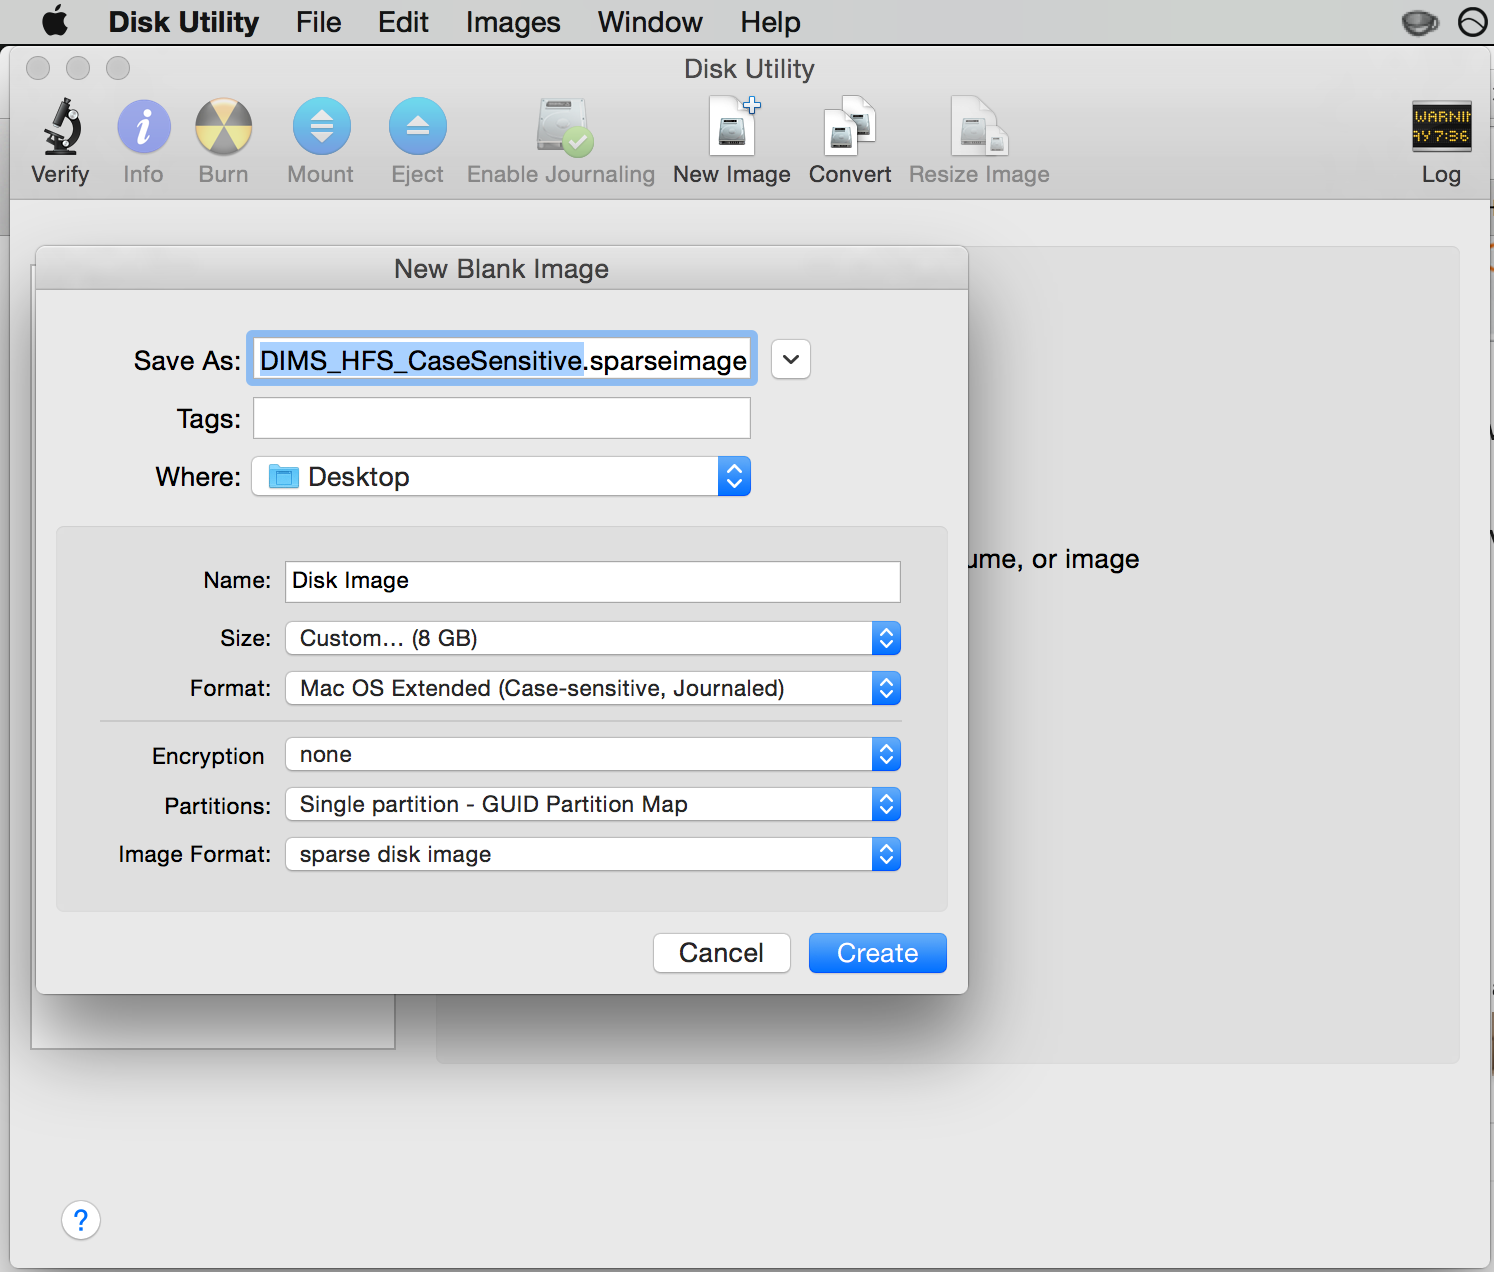
Creating a sparse image with Disk Utility
Move the existing directory to another name, so we can replace that directory with an empty directory to act a mount point for our sparse bundle:
[dittrich@localhost ~]$ cd ~/dims
[dittrich@localhost dims]$ mv git git.tmp
[dittrich@localhost dims]$ mkdir git
Mount the sparse image using
hdiutil:1 2 3 4 5 6 7 8 9 10 11
  [dittrich@localhost dims]$ hdiutil attach -mountpoint ~/dims/git ~/Desktop/DIMS_HFS_CaseSensitive.sparseimage
  /dev/disk3              GUID_partition_scheme
  /dev/disk3s1            EFI
  /dev/disk3s2            Apple_HFS                       /Users/dittrich/dims/git
  [dittrich@localhost dims]$ mount
  /dev/disk1 on / (hfs, local, journaled)
  devfs on /dev (devfs, local, nobrowse)
  map -hosts on /net (autofs, nosuid, automounted, nobrowse)
  map auto_home on /home (autofs, automounted, nobrowse)
  /dev/disk2s1 on /Volumes/_mdSSD (hfs, local, nodev, nosuid, journaled, noowners)
  /dev/disk3s2 on /Users/dittrich/dims/git (hfs, local, nodev, nosuid, journaled, noowners, mounted by dittrich)
Move the files from the temporary directory into the case-sensitive mounted volume, or re-clone any repositories that were causing problems with case-sensitive files, then delete the temporary directory.
[dittrich@localhost dims]$ mv git.tmp/* git
[dittrich@localhost dims]$ rmdir git.tmp
Add lines to your
~/.bash_profilefile to ensure this sparse image is mounted at the start of every initial login session.mount | grep -q "$HOME/dims/git" if [ $? -eq 1 ]; then hdiutil attach -mountpoint ~/dims/git ~/Desktop/DIMS_HFS_CaseSensitive.sparseimage 2>/dev/null mount | grep -q "$HOME/dims/git" if [ $? -ne 0 ]; then echo "[---] Failed to mount ~/Desktop/DIMS_HFS_CaseSensitive.sparseimage to ~/dims/git" fi fi
You should see something like the following for the initial terminal window:
Last login: Fri Feb 13 04:48:45 on ttys005


[+++] DIMS shell initialization
[+++] Sourcing /opt/dims/etc/bashrc.dims.d/bashrc.dims.virtualenv ...
[+++] Activating DIMS virtual environment (dimsenv)
[+++] (Create file /Users/dittrich/.DIMS_NO_DIMSENV_ACTIVATE to disable)
[+++] Virtual environment dimsenv activated
[+++] Mounted sshfs gituser@git.devops.develop:cfg as /Users/dittrich/dims/cfg
/dev/disk3               GUID_partition_scheme
/dev/disk3s1             EFI
/dev/disk3s2             Apple_HFS                       /Users/dittrich/dims/git
/dev/disk3s2 on /Users/dittrich/dims/git (hfs, local, nodev, nosuid, journaled, noowners, mounted by dittrich)
Note
If you forgot to set a volume label when you created the sparse image file in Disk Utility, and the disk image just created gets mounted as “Disk Image”, you may wish to change the label. To do this, after the volume is mounted you can rename it using the command:
[dittrich@localhost docs (develop)]$ diskutil rename "Disk Image" DIMS_Git
Volume on disk2s2 renamed to DIMS_Git
If/when the sparse image becomes filled, you can compact it using
hdiutilas described in the superuser post Shrink a .sparseimage.[dimsenv] dittrich@27b:~ () $ hdiutil eject /Users/dittrich/dims/git "disk2" unmounted. "disk2" ejected. [dimsenv] dittrich@27b:~ () $ hdiutil compact ~/Desktop/DIMS_HFS_CaseSensitive.sparseimage Starting to compact… Reclaiming free space… ................................................................................................................................................................................................ Finishing compaction… .................................................................................................................................................................................................... Reclaimed 1.3 GB out of 6.2 GB possible.